2. DELINEATION aka creating 3D template file ‘.t3d’
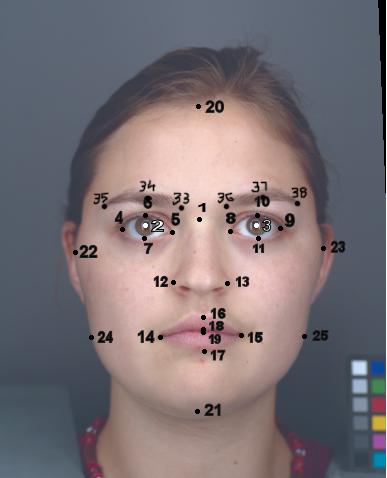
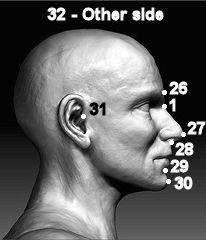
The delineation points’ map can be viewed here:
There is no auto-delineation at the time of writing. For each new face you have to put all the points on the face anew. On the positive side though, there are only 38 points to add, and with practice shouldn’t take more than 5 min.
1.Load a 3D image.
2.Open delineation toolbar from “Template menu” by selecting “Display Template” (shortcut ‘1’ on the keyboard). Morphanalyser should display a vertical toolbar on the left hand side of the program.
3.To start delineating the image, make sure the ‘Add Point’ button is selected on the toolbar (it’s the one with a fat green dot and a thin black plus sign on it).
4.Once selected, use the right-click button on the mouse to add points on the face.
5.The points should be added in the order as they appear on the 3D points delineation page. The order is important as any deviance from it will make it impossible to warp the face to the standard image properly and hence it would be impossible to average or transform the image using other 3D images.
6.You can delete a single point by selecting the ‘Delete Point’ button on the template toolbar. (You can also delete all the points displayed by clicking the ‘Delete All’ button on the top of the screen. This is especially useful when loading a new image right after having delineated one - Morphanalyser, by default, leaves the previous template on display and you can get rid of it by using this button).
7.If you need to adjust the location of a point already placed, select the ‘Move Point’ button (it’s the one with arrows on it). Right-click and hold on the point to be moved - it will turn red. Drag it to the desired position and release.
8.Morphanalyser labels (but does not display by default) each point with ‘point’ and the sequence number. If you want to check if you have placed the points in the right order, select ‘Display Names’ from the “Template” menu. Note that Morphanalyser labels the points starting from ‘0’ and not ‘1’ as shown in the 3D point coordinates page so the points in Morphanalyser should be 1 number less than on the coordinates page.
9.Once all the points have been placed, click the ‘Move to Face’ button on the template toolbar (not easy to describe what it looks like, but it has an arrow in the icon and is located towards the bottom of the template toolbar).
10.Click “Save” button and save the template with exactly the same name as the ‘.obj’ file you are delineating (otherwise if the names don’t match, Morphanalyser won’t recognize that it is the template for this face).
Attachments (2)
-
points.jpg
(16.3 KB
) - added by 14 years ago.
Location of points (frontal view)
-
points-side.jpg
(9.0 KB
) - added by 14 years ago.
Points from the side
Download all attachments as: .zip


